Setting Up and Using Acropolis File Services (AFS) on Nutanix AOS 5.0

This article will show you the steps involved to setup Acropolis File Services (AFS) on a cluster running AOS 5.0.

Acropolis File Services (AFS) uses a scale-out architecture that provides Server Message Block (SMB) file shares to Windows clients for home directory and user profiles. Acropolis File Services consist of three or more file server VMs (FSVM). There is one file server maximum per cluster image. A set of file server VMs is also known as a Acropolis File Services cluster. Multiple file server clusters can be created on a Nutanix cluster.

With the AOS 5.0 release, Acropolis File Services can be used when running ESXi or AHV as the hypervisor on your Nutanix cluster.

A great document to refer to is the Acropolis File Services Guide, which can be found on the Nutanix portal here: https://portal.nutanix.com/#/page/docs/details?targetId=Acropolis-File-Services-Guide-v20:Acropolis-File-Services-Guide-v20

Setup the Cluster Data Services IP

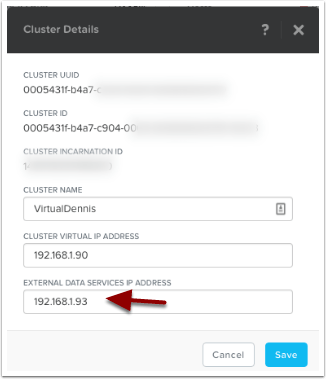
One of the prerequisites for AFS is to setup a Cluster Data Services IP. We can set that up by clicking on the cluster name in Prism. In the sample below, I’m clicking on the cluster name.

Setup the External Data Services IP Address by typing in a new unused IP address into the field as shown below. Then select the “Save” button.

File Services

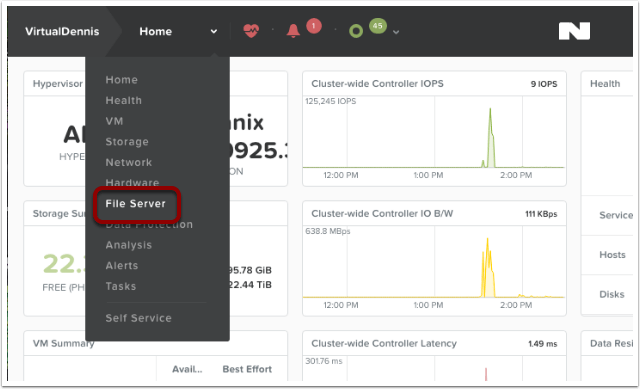
Now we can start the configuration of File Services by selecting the main menu in Prism, then choose “File Server” from the dropdown.

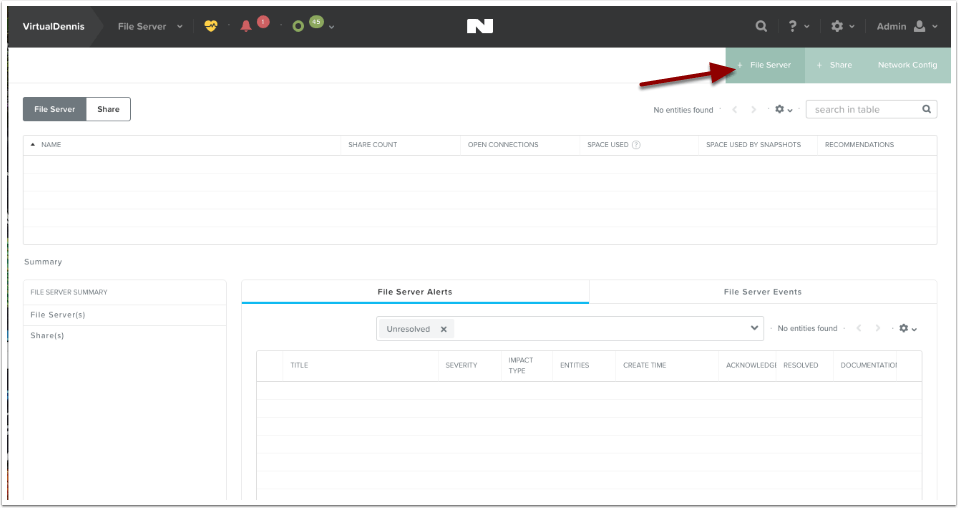
To begin creating a new file server, click on the button labeled “+ File Server” in the upper right-hand side of the screen.

File Services Pre-Check

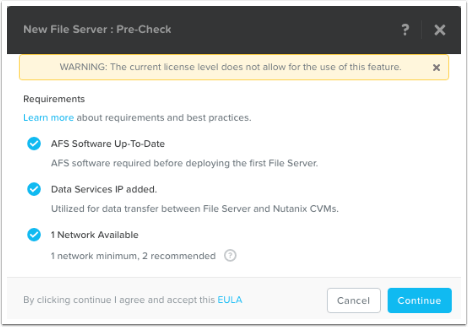
The system will now show you a few “pre-checks” that are performed to make sure the requirements are met. If any of these items do not have a blue check-mark next to them, go ahead and resolve the item then try it again. To continue, click on the “Continue” button.

Note: The error “WARNING: The current license level does not allow for the use of this feature.” is only a Warning. You can still proceed to use the feature (and test it out), however please contact your Nutanix Account team to resolve.
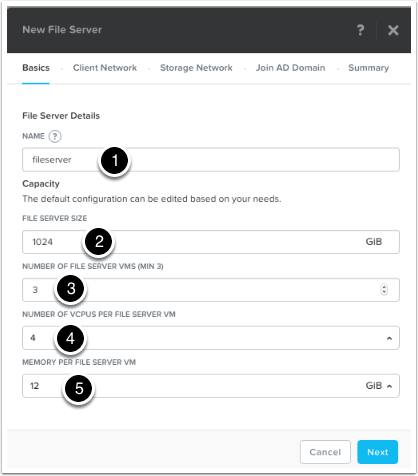
File Server Basics

Next, fill in the File Server details:

(1) Name: This is the name of the File Server that will be used when browsing to the file share.

(2) File Server Size: This is the amount of storage reserved for File Services (from the Nutanix Storage Pool). Currently, a minimum of 1 TB is required.

(3) Number of File Servers VMs: This is the number of file servers that will be deployed in the cluster. A minimum of 3 VM’s is needed to make a distributed file server. Additional VM’s can be added later through the “Scale Up” wizard.

(4) Number of vCPUs per File Server VM: This is the amount of vCPU’s assigned to each File Server VM.*

(5) Memory Per File Server VM: This is the amount of RAM assigned to each File Server VM.*

* For sizing the amount of vCPU’s and RAM assigned to each File Server VM, refer to this section of the Acropolis File Services Guide: https://portal.nutanix.com/#/page/docs/details?targetId=Acropolis-File-Services-Guide-v20:acr-file-server-system-limits-r.html

Press “Next” to proceed.

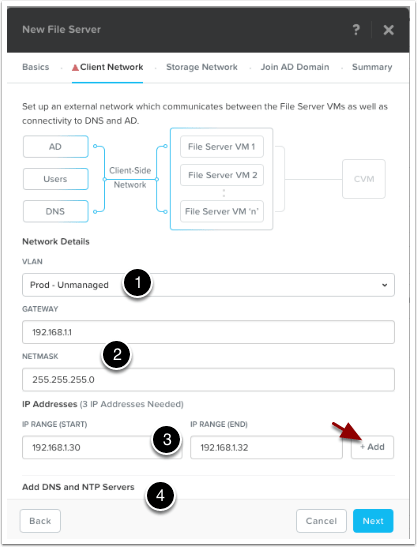
Client Network Configuration

The Client Network screen will be shown outlining how the File Server VM’s will communicate out onto the network, to DNS, AD and to the end users.

(1) Pick the VLAN that you want this traffic on from the dropdown under Network Details, “VLAN“. In my example below, I only have 1 network which is pretty flat. If yours is like this, just choose your standard VLAN.

(2) Type in the network Gateway and Subnet Mask for the network you chose.

(3) Allocate a range of at least 3 IP Addresses, which will be used for the File Server VM’s client-side traffic. Once you fill in the range, click on the “+Add” button.

(4) The DNS and NTP settings should auto-populate (pulled from the cluster), but scroll down and verify the settings (Note: the NTP server should be the domain controller!)

Once completed, click on the “Next” button to continue.

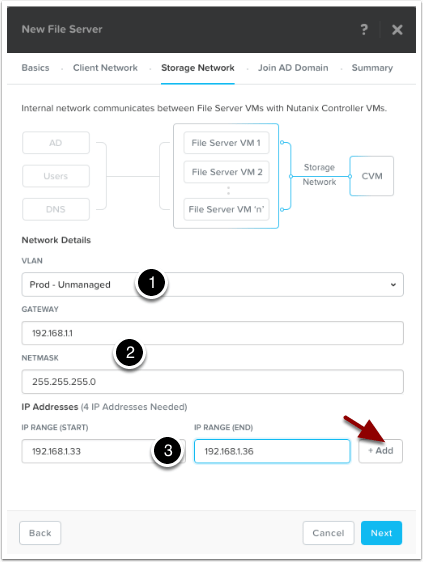
Storage Network Configuration

The Storage Network screen will be shown outlining how the File Server VM’s will communicate with the Nutanix Controller VM’s.

(1) Pick the VLAN that you want this traffic on from the dropdown under Network Details, “VLAN“. In my example below, I only have 1 network which is pretty flat. If yours is like this, just choose your standard VLAN.

(2) Type in the network Gateway and Subnet Mask for the network you chose.

(3) Allocate a range of at least 4 IP Addresses, which will be used for the File Server VM’s storage traffic. Once you fill in the range, click on the “+Add” button.

Once finished, click on the “Next” button to continue.

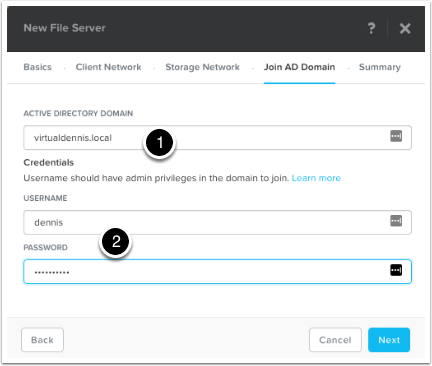
Joining Active Directory

To join the file services to your active directory domain, type in your active directory domain name (1).

Type in a username and password for a user that will have admin level privileges to join the domain (2).

Once completed, click on the “Next” button to continue.

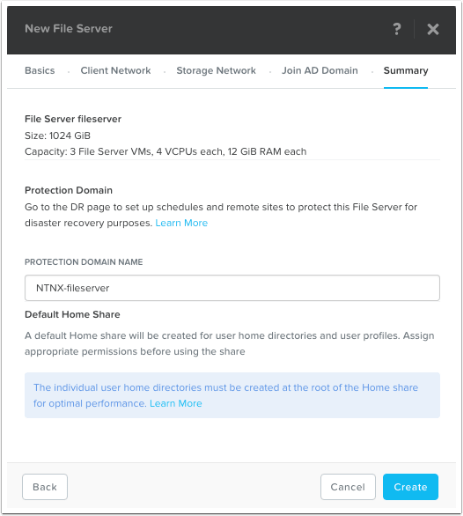
Summary and Protection Domain Setup

On the Summary screen, the wizard will show you how the file services will be configured. It will also ask you what you want to call the Protection Domain that will be created automatically. As noted, don’t forget to edit the Protection Domain (under the Menu –> Data Protection screen) to setup schedules and potential replication. For more information on setting up the Protection Domain, refer to the Acropolis File Services Guide located here: https://portal.nutanix.com/#/page/docs/details?targetId=Acropolis-File-Services-Guide-v20:acr-file-server-async-dr-c.html

As noted near the bottom of the screen, create user directories in the root of the home share for optimal performance. AFS creates a default home share for user home directory and user profiles. Individual user home directories must be created at the root of the Home share for optimal performance.

Click on the “Create” button to start the File Services deployment.

Monitoring File Services Deployment

You can monitor the File Services Deployment from the “Tasks” menu icon at the top of the screen.

Monitor for any Errors in Deployment

Prism will show you any errors that might show up during the deployment. In my example below, you’ll see that it couldn’t join the Active Directory Domain for some reason.

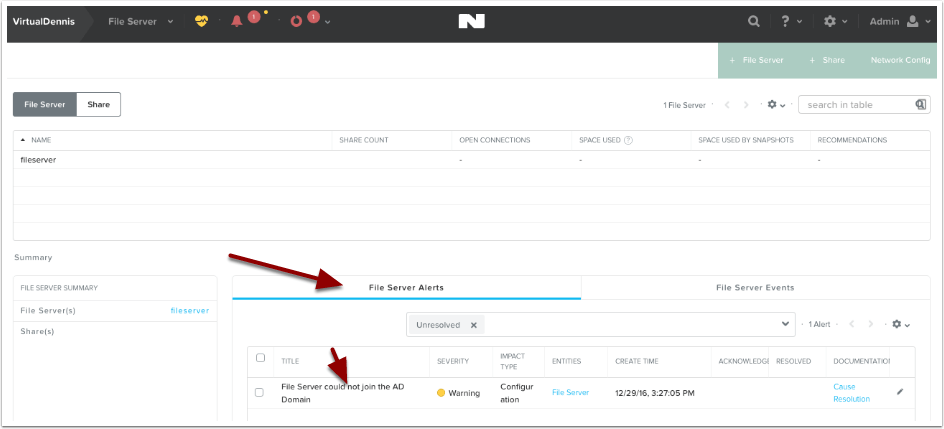
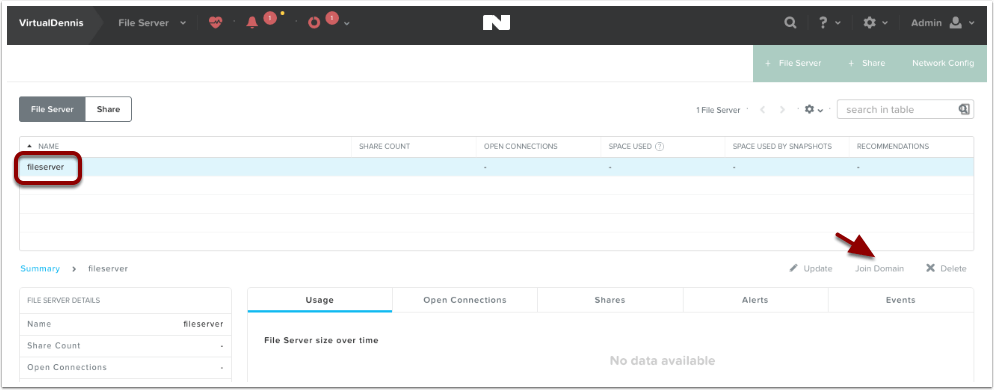
In my example, the file server couldn’t join the Active Directory domain and I needed to try again. By selecting the File Server in the list, an option will appear to “Join Domain”. I was able to try again and this time it worked. Note: Your domain needs to be at the functional level of Windows Server 2008 R2 or higher.

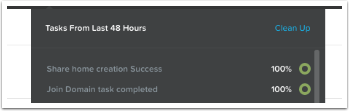
Successful Deployment

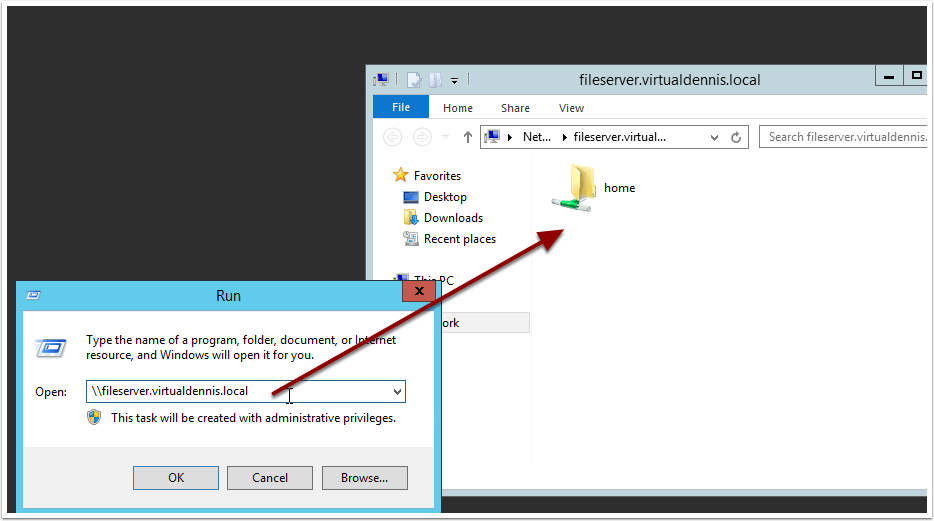
Once the deployment and join to the domain is completed, the tasks icon will show joining the domain completed successfully and a default “home” share was created.

Once successfully deployed, you can now browse to the file server using the \\file-server-name path syntax, which you’ll see the default “home” share that has been created.

Quota Management

By default, all users accessing the “home” share do not have any quotas in place. If you would like to change this, select the “home” share from the “Share” submenu, and click on the “Quotas” tab. Here you can edit the existing default quota or add additional quota policies.

Enabling Windows Previous Versions

A Windows Previous version allows you to create and view manual or automatic snapshots of share (or volumes) when the share is in use. The share snapshots are read-only and point-in-time (snapshots taken at a certain time) copies. You can view or restore removed or overwritten files. This allows you to choose a share snapshot from the same file at different times during the file’s history. Snapshots can be scheduled for regular or frequent intervals to provide same-day protection against accidental deletions. WPV can be enabled for each object in a share.

WPV is disabled by default. You can enable WPV during or after share creation. Share updates are supported for both general-purpose and home shares.

To enable or disable Windows Previous Versions after share creation, do the following.

  1. In the Prism web console, go to Home > File Server.
  2. Click the Share tab in the view selector.
  3. Select a share and click Update in the action links.
  4. Select Enable Windows Previous Version (WPV) to check (enable) or clear (disable) the box.
  5. Click Save. Be sure the WPV box is checked to enable.
Ledger - Crypto Beginners Pack

Microsoft to invest $1BN in Malaysian data centres

Microsoft is set to invest $1bn in Malaysia to set up data centres in the country over the next five years, reported Reuters on Monday.

According to a statement from the Malaysian Prime Minister, the technology giant will make the investment through a partnership programme with government agencies and local companies.

In February, the government had granted special permission to Microsoft, Google, Amazon and Telekom Malaysia to build data centres and provide cloud services.

Investments from those cloud service providers were expected to total between $2.91bn-$3.64bn over the next five years.


As part of the Bersama Malaysia initiative, Microsoft would establish its first “datacentre region”, consisting of multiple data centres in Malaysia to manage data from several countries, Prime Minister Muhyiddin Yassin said at an event marking the launch of the programme.

“The upcoming datacenter region will be a game-changer for Malaysia,” Microsoft Executive Vice President Jean-Philippe Courtois said in a statement, adding that it would enable the government and businesses to “transform” their operations.

Included in the programme was assistance from Microsoft to help up to a million Malaysians sharpen their digital skills by the end of 2023.

Ledger - Crypto Beginners Pack

Samsung Cloud is closing down – so migrate your photos and files now

Samsung Cloud will no longer support Gallery Sync, Samsung Cloud Drive or Premium Storage

Samsung Cloud is a cloud storage service that allows owners of Samsung devices to create copies of their data or free up local storage space for apps, music and other files.

However, Samsung is about to begin the process of cutting back this service, withdrawing the ability to store photos and files off-device. Soon, Samsung Cloud will only allow users to store lightweight items, such as contacts, calendars and notes.

According to a notice on the website, the automatic photo and file sync features will be supported by Microsoft OneDrive instead, but only if users take the necessary action before the deadline.

Check out our list of the best micro SD cards on the market
Here’s our rundown of the best USB flash drives out there
We’ve built a list of the best rugged hard drives around.

Samsung Cloud will no longer support Gallery Sync, Samsung Cloud Drive or Premium Storage

Samsung Cloud is a cloud storage service that allows owners of Samsung devices to create copies of their data or free up local storage space for apps, music and other files.

However, Samsung is about to begin the process of cutting back this service, withdrawing the ability to store photos and files off-device. Soon, Samsung Cloud will only allow users to store lightweight items, such as contacts, calendars and notes.

According to a notice on the website, the automatic photo and file sync features will be supported by Microsoft OneDrive instead, but only if users take the necessary action before the deadline.

Check out our list of the best micro SD cards on the market
Here’s our rundown of the best USB flash drives out there
We’ve built a list of the best rugged hard drives around

Samsung Cloud deadlines
The pace of the Samsung Cloud shutdown will depend on the region in which you are located. The deadlines for Group 1, which consists of the UK, US, Australia and many European countries, differ from the deadlines for Group 2, which covers much of Asia, Africa and the Middle East.

Members of Group 1 will need to migrate their Samsung Cloud data to OneDrive by the end of tomorrow, March 31. Affected smartphone owners should receive a notification that prompts them to activate the migration process, which is made easy thanks to a OneDrive integration.

If this deadline is missed, Group 1 users will have until June 30 to download their Samsung Cloud data to their device or a computer. On July 1, all photos and files held in Samsung Cloud will be deleted outright and will no longer be recoverable.

Group 2 has been given a little more time to make the necessary arrangements. These users have until May 31 to migrate their data to OneDrive and until August 31 to perform a manual download. On September 1, Samsung Cloud will no longer store the photos or files of any user, in any territory.

Anyone that holds a Premium Storage subscription can expect their plan to be cancelled on either April 1 (Group 1) or June 1 (Group 2) and may receive a refund.

OneDrive storage capacity
Although free Microsoft OneDrive accounts are usually allocated only 5GB of storage, anyone migrating from Samsung Cloud will be given 15GB of storage free of charge, the same capacity as the free Samsung account.

However, the expanded OneDrive storage offer will expire after one year. After that, users will either have to pay to increase their OneDrive storage capacity or transfer their data to an external hard drive, portable SSD or another cloud backup service.

Working from home is the future, yet VMware just extended vSphere 6.5 support for a year because remote upgrades are too hard

VMware has extended support for vSphere 6.5 and vCenter 6.5 by a year, and says it needs to do so because customers are struggling to upgrade while their teams work from home/live in their offices.

News of the extension emerged in a Friday post by Paul Turner, veep for product management at VMware’s Cloud Platform Business Unit.

“This month marks a full year that many businesses transitioned to a work from home model with the onset of the global pandemic,” Turner wrote. “That’s created challenges for some of our customers with regards to IT operations and strategic planning. It has also led to uncertainty as to when your business operations will return to normal.”

“We can help address some of your challenges by offering you both flexibility and continued support as we all work together to get to the other side of this pandemic.”

The change means that vSphere 6.5 will reach end of general support(EoGS) on November 15th, 2022. A year later VMware will also stop offering technical guidance.

The new end of support dates now mirror those for vSphere 6.7.

VMware says faster growth will come once customers get back inside data centres

But even with an extra year, vCenter 6.5 have work to do because the client to drive it requires Adobe Flash. And Flash was put to rest in January 2021. If you can keep old Flash-enabled browsers enabled in your environment, cross your fingers, and feel free to stick with vCenter 6.5. Otherwise, VMware recommends an upgrade to vCenter 6.7 and its shiny new HTML5 client

Users of VMWare’s virtual storage array, VSAN, have also been given some extra time. Versions 6.5 and 6.6 were slated to go EoGS in November 2021. Support will now end in October 2022. End of technical guidance remains at November 2023 for both versions.

This isn’t the first time VMware has pointed out the negative effects of working from home: on in its Q3 2021 results call then-VMware-CEO Pat Gelsinger attributed slow signoff of major deals to customers who couldn’t get their teams back into the office to work on major projects.

How to unmount a LUN or detach a datastore device from ESXi hosts

This article provides steps to unmount a LUN from an ESXi 5.x/6.x host, which includes unmounting the file system and detaching the datastore/storage device. These steps must be performed for each ESXi host.  Easy to follow Step-by-Step Guide: How to Unmount a LUN or Detach a Datastore.

Unmounting a LUN using the command line

To unmount a LUN from an ESXi 5.x/6.x host using the command line:

  1. If the LUN is an RDM, skip to step 4. Otherwise, to obtain a list of all datastores mounted to an ESXi host, run this command:# esxcli storage filesystem list

    You see output, which lists all VMFS datastores, similar to:

    Mount Point Volume Name UUID Mounted Type Size Free
    ————————————————- ———– ———————————– ——- —— ———– ———–
    /vmfs/volumes/4de4cb24-4cff750f-85f5-0019b9f1ecf6 datastore1 4de4cb24-4cff750f-85f5-0019b9f1ecf6 true VMFS-5 140660178944 94577360896
    /vmfs/volumes/4c5fbff6-f4069088-af4f-0019b9f1ecf4 Storage2 4c5fbff6-f4069088-af4f-0019b9f1ecf4 true VMFS-3 146028888064 7968129024
    /vmfs/volumes/4c5fc023-ea0d4203-8517-0019b9f1ecf4 Storage4 4c5fc023-ea0d4203-8517-0019b9f1ecf4 true VMFS-3 146028888064 121057050624
    /vmfs/volumes/4e414917-a8d75514-6bae-0019b9f1ecf4 LUN01 4e414917-a8d75514-6bae-0019b9f1ecf4 true VMFS-5 146028888064 4266131456

  2. To find the unique identifier of the LUN housing the datastore to be removed, run this command:# esxcfg-scsidevs -m

    This command generates a list of VMFS datastore volumes and their related unique identifiers. Make a note of the unique identifier (NAA_ID) for the datastore you want to unmount as this will be used later on.

    For more information on the esxcfg-scsidevscommand, see Identifying disks when working with VMware ESX/ESXi (1014953).

  3. Unmount the datastore by running this command:# esxcli storage filesystem unmount [-uUUID | -l label | -p path ]

    For example, use one of these commands to unmount the LUN01 datastore:

    # esxcli storage filesystem unmount -l LUN01
    # esxcli storage filesystem unmount -u 4e414917-a8d75514-6bae-0019b9f1ecf4
    # esxcli storage filesystem unmount -p /vmfs/volumes/4e414917-a8d75514-6bae-0019b9f1ecf4

    Note: If the VMFS filesystem you are attempting to unmount has active I/O or has not fulfilled the prerequisites to unmount the VMFS datastore, you see an error in the VMkernel logs similar to:

    WARNING: VC: 637: unmounting opened volume (‘4e414917-a8d75514-6bae-0019b9f1ecf4’ ‘LUN01’) is not allowed.
    VC: 802: Unmount VMFS volume f530 28 2 4e414917a8d7551419006bae f4ecf19b 4 1 0 0 0 0 0 : Busy

  4. To verify that the datastore is unmounted, run this command:# esxcli storage filesystem list

    You see output similar to:

    Mount Point Volume Name UUID Mounted Type Size Free
    ————————————————- ———– ———————————– ——- —— ———– ———–
    /vmfs/volumes/4de4cb24-4cff750f-85f5-0019b9f1ecf6 datastore1 4de4cb24-4cff750f-85f5-0019b9f1ecf6 true VMFS-5 140660178944 94577360896
    /vmfs/volumes/4c5fbff6-f4069088-af4f-0019b9f1ecf4 Storage2 4c5fbff6-f4069088-af4f-0019b9f1ecf4 true VMFS-3 146028888064 7968129024
    /vmfs/volumes/4c5fc023-ea0d4203-8517-0019b9f1ecf4 Storage4 4c5fc023-ea0d4203-8517-0019b9f1ecf4 true VMFS-3 146028888064 121057050624
    LUN01 4e414917-a8d75514-6bae-0019b9f1ecf4 false VMFS-unknown version 0 0

    The Mounted field is set to false, the Type field is set to VMFS-unknown version, and that no Mount Point exists.

    Note: The unmounted state of the VMFS datastore persists across reboots. This is the default behavior. If you need to unmount a datastore temporarily, you can do so by appending the –no-persist flag to the unmountcommand.

  5. To detach the device/LUN, run this command:# esxcli storage core device set –state=off -d NAA_ID
  6. To verify that the device is offline, run this command:# esxcli storage core device list -dNAA_ID

    You see output, which shows that the Status of the disk is off, similar to:

    naa.60a98000572d54724a34655733506751
    Display Name: NETAPP Fibre Channel Disk (naa.60a98000572d54724a34655733506751)
    Has Settable Display Name: true
    Size: 1048593
    Device Type: Direct-Access
    Multipath Plugin: NMP
    Devfs Path: /vmfs/devices/disks/naa.60a98000572d54724a34655733506751
    Vendor: NETAPP
    Model: LUN
    Revision: 7330
    SCSI Level: 4
    Is Pseudo: false
    Status: off
    Is RDM Capable: true
    Is Local: false
    Is Removable: false
    Is SSD: false
    Is Offline: false
    Is Perennially Reserved: false
    Thin Provisioning Status: yes
    Attached Filters:
    VAAI Status: unknown
    Other UIDs: vml.020000000060a98000572d54724a346557335067514c554e202020

    Running the partedUtil getptbl command on the device shows that the device is not found.

    For example:

    # partedUtil getptbl /vmfs/devices/disks/naa.60a98000572d54724a34655733506751

    Error: Could not stat device /vmfs/devices/disks/naa.60a98000572d54724a34655733506751 – No such file or directory.
    Unable to get device /vmfs/devices/disks/naa.60a98000572d54724a34655733506751

  7. If the device is to be permanently decommissioned, it is now possible to unpresent the LUN from the SAN. For more information, contact your storage team, storage administrator, or storage array vendor.
  8. To rescan all devices on the ESXi host, run this command:# esxcli storage core adapter rescan [ -Avmhba# | –all ]

    The devices are automatically removed from the Storage Adapters.

    Notes:

    • A rescan must be run on all hosts that had visibility to the removed LUN.
    • When the device is detached, it stays in an unmounted state even if the device is re-presented (that is, the detached state is persistent). To bring the device back online, the device must be attached. To do this via the command line, run this command:# esxcli storage core device set –state=on -d NAA_ID
  9. If the device is to be permanently decommissioned from an ESXi host, (that is, the LUN has been or will be destroyed), remove the NAA entries from the host configuration by running these commands:
    1. To list the permanently detached devices:# esxcli storage core device detached list

      You see output similar to:

      Device UID State
      —————————- —–
      naa.50060160c46036df50060160c46036df off
      naa.6006016094602800c8e3e1c5d3c8e011 off

    2. To permanently remove the device configuration information from the system:# esxcli storage core device detached remove -d NAA_ID

      For example:

      # esxcli storage core device detached remove -d naa.50060160c46036df50060160c46036df