AI Reality Check: What Last Week’s Stock Crash Means for Broadcom, AMD, Oracle, and Meta

Author: everythingcryptoitclouds.com

Introduction: The Jolt to the AI Trade

Last week, the seemingly unstoppable AI stock rally hit a major speed bump. A sharp selloff, triggered by disappointing news from key players, sent shockwaves through the market, raising the specter of an “AI bubble.” While the overall AI narrative remains robust, the correction served as a crucial reality check, reminding investors that even the most promising growth stories are subject to market scrutiny.

The focus of this correction centered on two major infrastructure providers: Broadcom (AVGO) and Oracle (ORCL). Their struggles quickly dragged down other AI-exposed giants, including Advanced Micro Devices (AMD) and Meta Platforms (META). This article breaks down the reasons behind the crash, analyzes the short-term outlook for the next four weeks, and provides a forecast for early 2026.

AI Crash Visualization

Anatomy of the Selloff: Broadcom and Oracle’s One-Two Punch

The market correction was primarily ignited by a one-two punch from two companies whose fortunes are deeply tied to the AI infrastructure buildout.

Broadcom’s Margin Scare: Despite reporting better-than-expected quarterly results and strong guidance, Broadcom’s stock plummeted by 11%. The core concern was a warning from management that gross margins would be lower in the short term. This is due to the higher up-front costs associated with producing complex custom AI chip systems and server racks. Furthermore, the CEO tempered expectations for a major deal with OpenAI in 2026, suggesting the immediate revenue boost might not be as explosive as investors had hoped.

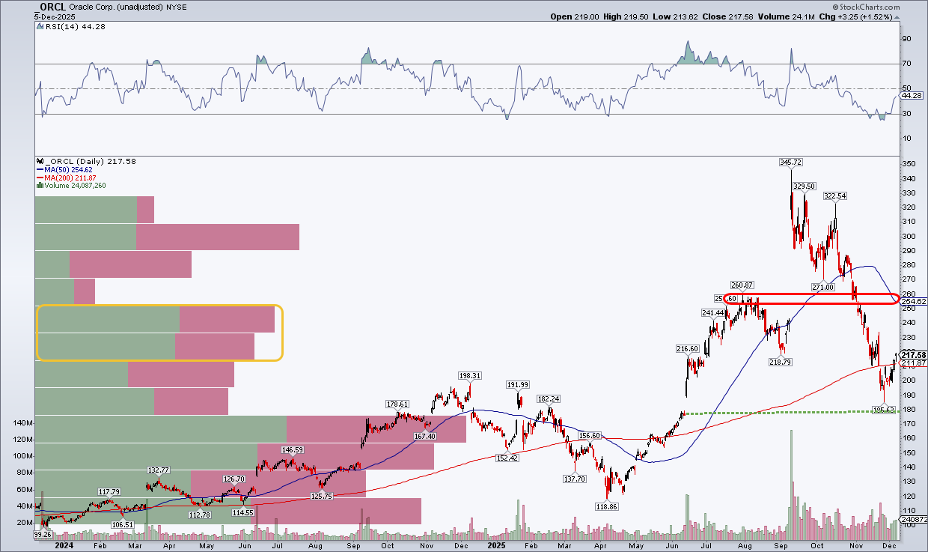
Oracle’s Financing Disappointment: Oracle’s stock had already plunged 10% before dropping another 4.5% in the wake of its mixed earnings report (beating on earnings per share but missing on revenue). Investors were particularly disappointed by the lack of detail on how the company plans to finance its massive, debt-fueled AI data center expansion. This raised questions about the sustainability and profitability of the aggressive infrastructure spending required to compete in the AI cloud space.

The combination of Broadcom’s margin concerns and Oracle’s financing uncertainty created a wave of “AI angst,” leading to a broader selloff in the sector.

Oracle Broadcom Chart

Short-Term Outlook: The Next Four Weeks

The next four weeks, often characterized by holiday trading and year-end portfolio adjustments, will be crucial for these stocks.

| Company | Crash Reason | Short-Term Outlook (Next 4 Weeks) |
| :— | :— | :— |
| Broadcom (AVGO) | Margin contraction on custom AI chips. | Analysts are largely recommending to “buy the dip,” viewing the selloff as an overreaction to short-term margin pressure. The underlying demand for their custom chips from hyperscalers remains robust. |
| Oracle (ORCL) | Missed revenue and financing uncertainty. | Volatility is likely as the market digests the debt concerns. A clear communication from management regarding their CapEx financing strategy could stabilize the stock, but until then, it remains under pressure. |
| Advanced Micro Devices (AMD) | General AI trade selloff. | Expected to stabilize quickly. The drop was largely collateral damage from the Broadcom/Oracle news. Strong demand for its EPYC CPUs and Instinct GPUs in the data center market provides a solid floor. |
| Meta Platforms (META) | General AI trade selloff. | Strongly positioned for a rebound. News of trimming the metaverse budget to prioritize AI spending is a positive signal for investors. The stock is likely to benefit from the “flight to quality” within the AI sector. |

Early 2026 Forecast: The Infrastructure Boom Continues

Despite the recent correction, the long-term forecast for the AI infrastructure sector remains overwhelmingly bullish, especially as we head into early 2026. The fundamental driver is the massive, non-negotiable capital expenditure (CapEx) being committed by the world’s largest tech companies.

Meta’s AI Commitment: Meta Platforms is a prime example of this long-term commitment. The company is aggressively shifting resources away from its metaverse division to focus on building out its AI capabilities. Analysts project Meta’s 2026 CapEx to reach an astonishing $109 billion, more than triple its 2023 spending. This colossal investment is primarily directed at AI infrastructure, including the purchase of chips and the construction of data centers.

The Demand for Silicon: This spending spree directly benefits chipmakers like Broadcom and AMD. Broadcom’s custom chip business, despite the short-term margin hit, is poised for massive growth as it supplies hyperscalers like Meta and Google. Similarly, AMD is forecast to see a 20%+ increase in revenue in 2026, driven by the insatiable demand for its high-performance EPYC and Instinct GPUs in the data center. The AI arms race is far from over, and these companies are the essential suppliers.

Oracle’s Long Game: While Oracle faces short-term financing questions, its long-term strategy hinges on becoming a major player in the AI cloud. The massive data center buildout, while costly, is a necessary step to capture future AI-driven revenue. If the company can effectively communicate its financing plan and execute on its AI pipeline, the stock could see a significant recovery in 2026.

AI Data Center

Conclusion: A Correction, Not a Collapse

The recent AI stock selloff was a healthy, albeit painful, market correction. It was driven by specific, company-level concerns about margins and financing, not a collapse in the underlying demand for artificial intelligence.

For investors, the message is clear: the AI revolution is still in its early stages, and the long-term trend of massive infrastructure spending is intact. The next four weeks may see continued volatility as the market finds its footing, but the outlook for early 2026 remains bright. The companies that are the essential building blocks of the AI future—Broadcom, AMD, Oracle, and Meta—are poised to be the biggest beneficiaries of this sustained, multi-year boom.

How to Safely Unmount a LUN and Detach a Datastore from ESXi Hosts

This comprehensive guide walks you through the process of safely unmounting a LUN or detaching a datastore from ESXi 5.x/6.x/7.x hosts. These operations must be performed on each ESXi host that has access to the storage device.

Prerequisites and Important Considerations

Before proceeding with the unmount process, ensure the following requirements are met:

  • Migrate all data: Move all virtual machines, templates, snapshots, and files off the target datastore
  • Remove RDM mappings: If the LUN is used as a Raw Device Mapping (RDM), remove it from VM configurations first
  • Disable Storage DRS: Ensure the datastore is not part of a datastore cluster
  • Check HA heartbeat: Verify the datastore isn’t used for vSphere HA heartbeating
  • Stop active I/O: Confirm no applications or processes are actively using the datastore

Step 1: Identify the Target Datastore and LUN

List All Mounted Datastores

First, identify the datastore you want to unmount by listing all current datastores:

esxcli storage filesystem list


Sample Output:

Mount Point                                       Volume Name  UUID                                 Mounted  Type    Size         Free
------------------------------------------------- ------------ ------------------------------------ -------- ------- ------------ ------------
/vmfs/volumes/4de4cb24-4cff750f-85f5-0019b9f1ecf6 datastore1   4de4cb24-4cff750f-85f5-0019b9f1ecf6 true     VMFS-5  140660178944 94577360896
/vmfs/volumes/4c5fbff6-f4069088-af4f-0019b9f1ecf4 Storage2     4c5fbff6-f4069088-af4f-0019b9f1ecf4 true     VMFS-3  146028888064 7968129024
/vmfs/volumes/4e414917-a8d75514-6bae-0019b9f1ecf4 LUN01        4e414917-a8d75514-6bae-0019b9f1ecf4 true     VMFS-5  146028888064 4266131456


Find the LUN’s Unique Identifier

Next, obtain the NAA ID (unique identifier) for the LUN housing your target datastore:

esxcfg-scsidevs -m


This command maps VMFS datastores to their underlying storage devices. Note the NAA_ID for your target datastore as you’ll need it for the detach operation.

Step 2: Unmount the Datastore

Unmount Using Command Line

Unmount the datastore using one of the following methods:

By Label:

esxcli storage filesystem unmount -l LUN01


By UUID:

esxcli storage filesystem unmount -u 4e414917-a8d75514-6bae-0019b9f1ecf4


By Path:

esxcli storage filesystem unmount -p /vmfs/volumes/4e414917-a8d75514-6bae-0019b9f1ecf4


Verify Unmount Success

Confirm the datastore is unmounted by running:

esxcli storage filesystem list


Expected Output for Unmounted Datastore:

Mount Point  Volume Name  UUID                                 Mounted  Type                Size  Free
------------ ------------ ------------------------------------ -------- ------------------- ----- ----
             LUN01        4e414917-a8d75514-6bae-0019b9f1ecf4 false    VMFS-unknown version 0     0


Key indicators of successful unmount:

  • Mounted field shows false
  • Type field shows VMFS-unknown version
  • Mount Point is empty

Troubleshooting Unmount Issues

If you encounter errors during unmount, check the VMkernel logs for messages like:

WARNING: VC: 637: unmounting opened volume ('4e414917-a8d75514-6bae-0019b9f1ecf4' 'LUN01') is not allowed.
VC: 802: Unmount VMFS volume ... : Busy


This indicates active I/O or unmet prerequisites. Ensure all VMs and processes have been moved off the datastore.

Step 3: Detach the LUN

Set Device to Offline State

Once the datastore is successfully unmounted, detach the underlying LUN:

esxcli storage core device set --state=off -d NAA_ID


Replace NAA_ID with the actual identifier you noted earlier.

Verify Device Detachment

Confirm the device is offline:

esxcli storage core device list -d NAA_ID


Sample Output:

naa.60a98000572d54724a34655733506751
   Display Name: NETAPP Fibre Channel Disk (naa.60a98000572d54724a34655733506751)
   Has Settable Display Name: true
   Size: 1048593
   Device Type: Direct-Access
   Multipath Plugin: NMP
   Status: off
   Is RDM Capable: true
   Is Local: false
   Is Offline: false


The Status field should show off, indicating successful detachment.

Additional Verification

You can also verify detachment using the partedUtil command:

partedUtil getptbl /vmfs/devices/disks/NAA_ID


Expected Output:

Error: Could not stat device /vmfs/devices/disks/NAA_ID - No such file or directory.
Unable to get device /vmfs/devices/disks/NAA_ID


This error message confirms the device is no longer accessible to the host.

Step 4: Storage Array Management

After detaching the LUN from all ESXi hosts, coordinate with your storage administrator to:

  1. Unpresent the LUN from the SAN fabric
  2. Remove LUN mappings from the storage array
  3. Decommission the LUN if it’s no longer needed

Step 5: Rescan Storage Adapters

Perform Storage Rescan

After the LUN is unpresented from the SAN, rescan all storage adapters on each affected ESXi host:

esxcli storage core adapter rescan --all


Or rescan a specific adapter:

esxcli storage core adapter rescan -A vmhba2


This removes the detached device from the Storage Adapters list and updates the host’s storage view.

Important: Perform this rescan on all hosts that previously had visibility to the removed LUN.

Step 6: Permanent Device Removal (Optional)

If the LUN is being permanently decommissioned, you can clean up the device configuration:

List Detached Devices

esxcli storage core device detached list


Sample Output:

Device UID                           State
------------------------------------ -----
naa.50060160c46036df50060160c46036df off
naa.6006016094602800c8e3e1c5d3c8e011 off


Remove Device Configuration

esxcli storage core device detached remove -d NAA_ID


Example:

esxcli storage core device detached remove -d naa.50060160c46036df50060160c46036df


Important Notes and Best Practices

Persistence Behavior

  • Unmounted state persists across reboots by default
  • For temporary unmounting, use the --no-persist flag:
  • esxcli storage filesystem unmount -l datastore_name --no-persist

Re-attaching Devices

If you need to bring a detached device back online:

esxcli storage core device set --state=on -d NAA_ID


Safety Considerations

  1. Always perform these steps in order: unmount first, then detach
  2. Coordinate with your team: Ensure no other administrators are working on the same storage
  3. Document the process: Keep records of which LUNs were removed and when
  4. Test in non-production: Practice these procedures in a lab environment first

Cluster-Wide Operations

When working with clustered environments:

  • Perform these steps on each host in the cluster
  • Consider using vCenter Server for coordinated operations
  • Ensure all hosts are in maintenance mode if performing major storage changes

This methodical approach ensures safe removal of storage devices without impacting your virtual infrastructure or causing data loss.

Working from home is the future, yet VMware just extended vSphere 6.5 support for a year because remote upgrades are too hard

VMware has extended support for vSphere 6.5 and vCenter 6.5 by a year, and says it needs to do so because customers are struggling to upgrade while their teams work from home/live in their offices.

News of the extension emerged in a Friday post by Paul Turner, veep for product management at VMware’s Cloud Platform Business Unit.

“This month marks a full year that many businesses transitioned to a work from home model with the onset of the global pandemic,” Turner wrote. “That’s created challenges for some of our customers with regards to IT operations and strategic planning. It has also led to uncertainty as to when your business operations will return to normal.”

“We can help address some of your challenges by offering you both flexibility and continued support as we all work together to get to the other side of this pandemic.”

The change means that vSphere 6.5 will reach end of general support(EoGS) on November 15th, 2022. A year later VMware will also stop offering technical guidance.

The new end of support dates now mirror those for vSphere 6.7.

VMware says faster growth will come once customers get back inside data centres

But even with an extra year, vCenter 6.5 have work to do because the client to drive it requires Adobe Flash. And Flash was put to rest in January 2021. If you can keep old Flash-enabled browsers enabled in your environment, cross your fingers, and feel free to stick with vCenter 6.5. Otherwise, VMware recommends an upgrade to vCenter 6.7 and its shiny new HTML5 client

Users of VMWare’s virtual storage array, VSAN, have also been given some extra time. Versions 6.5 and 6.6 were slated to go EoGS in November 2021. Support will now end in October 2022. End of technical guidance remains at November 2023 for both versions.

This isn’t the first time VMware has pointed out the negative effects of working from home: on in its Q3 2021 results call then-VMware-CEO Pat Gelsinger attributed slow signoff of major deals to customers who couldn’t get their teams back into the office to work on major projects.

Getting Started With VMware Cloud on AWS

This guide provides information about creating cloud software-defined data centers (SDDCs) using VMware Cloud on AWS, configuring basic networking and other parameters for your SDDC, and connecting an SDDC to your on-premises data center.

After you have deployed and configured your SDDC, see the VMware Cloud on AWS Networking and Security Guide guide and the Operations Guide for information about advanced features that enable you to create a secure hybrid cloud with extended networking, single sign-on, and integration with other VMware and Amazon tools.

Intended Audience

This information is intended for anyone who wants to use VMware Cloud on AWS to create an SDDC that has the basic features required to run workloads in the cloud and can serve as a starting point for your exploration of additional features and capabilities. The information is written for readers who have used vSphere in an on-premises environment and are familiar with virtualization concepts. In-depth knowledge of vSphere or Amazon Web Services is not required.

How to unmount a LUN or detach a datastore device from ESXi hosts

This article provides steps to unmount a LUN from an ESXi 5.x/6.x host, which includes unmounting the file system and detaching the datastore/storage device. These steps must be performed for each ESXi host.  Easy to follow Step-by-Step Guide: How to Unmount a LUN or Detach a Datastore.

Unmounting a LUN using the command line

To unmount a LUN from an ESXi 5.x/6.x host using the command line:

  1. If the LUN is an RDM, skip to step 4. Otherwise, to obtain a list of all datastores mounted to an ESXi host, run this command:# esxcli storage filesystem list

    You see output, which lists all VMFS datastores, similar to:

    Mount Point Volume Name UUID Mounted Type Size Free
    ————————————————- ———– ———————————– ——- —— ———– ———–
    /vmfs/volumes/4de4cb24-4cff750f-85f5-0019b9f1ecf6 datastore1 4de4cb24-4cff750f-85f5-0019b9f1ecf6 true VMFS-5 140660178944 94577360896
    /vmfs/volumes/4c5fbff6-f4069088-af4f-0019b9f1ecf4 Storage2 4c5fbff6-f4069088-af4f-0019b9f1ecf4 true VMFS-3 146028888064 7968129024
    /vmfs/volumes/4c5fc023-ea0d4203-8517-0019b9f1ecf4 Storage4 4c5fc023-ea0d4203-8517-0019b9f1ecf4 true VMFS-3 146028888064 121057050624
    /vmfs/volumes/4e414917-a8d75514-6bae-0019b9f1ecf4 LUN01 4e414917-a8d75514-6bae-0019b9f1ecf4 true VMFS-5 146028888064 4266131456

  2. To find the unique identifier of the LUN housing the datastore to be removed, run this command:# esxcfg-scsidevs -m

    This command generates a list of VMFS datastore volumes and their related unique identifiers. Make a note of the unique identifier (NAA_ID) for the datastore you want to unmount as this will be used later on.

    For more information on the esxcfg-scsidevscommand, see Identifying disks when working with VMware ESX/ESXi (1014953).

  3. Unmount the datastore by running this command:# esxcli storage filesystem unmount [-uUUID | -l label | -p path ]

    For example, use one of these commands to unmount the LUN01 datastore:

    # esxcli storage filesystem unmount -l LUN01
    # esxcli storage filesystem unmount -u 4e414917-a8d75514-6bae-0019b9f1ecf4
    # esxcli storage filesystem unmount -p /vmfs/volumes/4e414917-a8d75514-6bae-0019b9f1ecf4

    Note: If the VMFS filesystem you are attempting to unmount has active I/O or has not fulfilled the prerequisites to unmount the VMFS datastore, you see an error in the VMkernel logs similar to:

    WARNING: VC: 637: unmounting opened volume (‘4e414917-a8d75514-6bae-0019b9f1ecf4’ ‘LUN01’) is not allowed.
    VC: 802: Unmount VMFS volume f530 28 2 4e414917a8d7551419006bae f4ecf19b 4 1 0 0 0 0 0 : Busy

  4. To verify that the datastore is unmounted, run this command:# esxcli storage filesystem list

    You see output similar to:

    Mount Point Volume Name UUID Mounted Type Size Free
    ————————————————- ———– ———————————– ——- —— ———– ———–
    /vmfs/volumes/4de4cb24-4cff750f-85f5-0019b9f1ecf6 datastore1 4de4cb24-4cff750f-85f5-0019b9f1ecf6 true VMFS-5 140660178944 94577360896
    /vmfs/volumes/4c5fbff6-f4069088-af4f-0019b9f1ecf4 Storage2 4c5fbff6-f4069088-af4f-0019b9f1ecf4 true VMFS-3 146028888064 7968129024
    /vmfs/volumes/4c5fc023-ea0d4203-8517-0019b9f1ecf4 Storage4 4c5fc023-ea0d4203-8517-0019b9f1ecf4 true VMFS-3 146028888064 121057050624
    LUN01 4e414917-a8d75514-6bae-0019b9f1ecf4 false VMFS-unknown version 0 0

    The Mounted field is set to false, the Type field is set to VMFS-unknown version, and that no Mount Point exists.

    Note: The unmounted state of the VMFS datastore persists across reboots. This is the default behavior. If you need to unmount a datastore temporarily, you can do so by appending the –no-persist flag to the unmountcommand.

  5. To detach the device/LUN, run this command:# esxcli storage core device set –state=off -d NAA_ID
  6. To verify that the device is offline, run this command:# esxcli storage core device list -dNAA_ID

    You see output, which shows that the Status of the disk is off, similar to:

    naa.60a98000572d54724a34655733506751
    Display Name: NETAPP Fibre Channel Disk (naa.60a98000572d54724a34655733506751)
    Has Settable Display Name: true
    Size: 1048593
    Device Type: Direct-Access
    Multipath Plugin: NMP
    Devfs Path: /vmfs/devices/disks/naa.60a98000572d54724a34655733506751
    Vendor: NETAPP
    Model: LUN
    Revision: 7330
    SCSI Level: 4
    Is Pseudo: false
    Status: off
    Is RDM Capable: true
    Is Local: false
    Is Removable: false
    Is SSD: false
    Is Offline: false
    Is Perennially Reserved: false
    Thin Provisioning Status: yes
    Attached Filters:
    VAAI Status: unknown
    Other UIDs: vml.020000000060a98000572d54724a346557335067514c554e202020

    Running the partedUtil getptbl command on the device shows that the device is not found.

    For example:

    # partedUtil getptbl /vmfs/devices/disks/naa.60a98000572d54724a34655733506751

    Error: Could not stat device /vmfs/devices/disks/naa.60a98000572d54724a34655733506751 – No such file or directory.
    Unable to get device /vmfs/devices/disks/naa.60a98000572d54724a34655733506751

  7. If the device is to be permanently decommissioned, it is now possible to unpresent the LUN from the SAN. For more information, contact your storage team, storage administrator, or storage array vendor.
  8. To rescan all devices on the ESXi host, run this command:# esxcli storage core adapter rescan [ -Avmhba# | –all ]

    The devices are automatically removed from the Storage Adapters.

    Notes:

    • A rescan must be run on all hosts that had visibility to the removed LUN.
    • When the device is detached, it stays in an unmounted state even if the device is re-presented (that is, the detached state is persistent). To bring the device back online, the device must be attached. To do this via the command line, run this command:# esxcli storage core device set –state=on -d NAA_ID
  9. If the device is to be permanently decommissioned from an ESXi host, (that is, the LUN has been or will be destroyed), remove the NAA entries from the host configuration by running these commands:
    1. To list the permanently detached devices:# esxcli storage core device detached list

      You see output similar to:

      Device UID State
      —————————- —–
      naa.50060160c46036df50060160c46036df off
      naa.6006016094602800c8e3e1c5d3c8e011 off

    2. To permanently remove the device configuration information from the system:# esxcli storage core device detached remove -d NAA_ID

      For example:

      # esxcli storage core device detached remove -d naa.50060160c46036df50060160c46036df